How to Hand Milk a Goat
Loading
Goat's Milk Production Variables
Freshening (coming into milk production) occurs at kidding. Milk production varies with the breed, age, quality, and diet of the doe; dairy goats generally produce between 660 to 1,800 L (1,500 and 4,000 lb) of milk per 305 day lactation. Doelings should be bred ideally by weight instead of age. Generally 80 pounds is the ideal weight, which is typically reached at about 7 to 8 months. The gestation period for a goat is 5 months, so your doe will be 12 to 13 months old the first time she kids. How much milk a doe produces will depend upon her breed and pedigree, but a well-balanced feeding program that is modified to meet the varying feed requirements throughout the various stages of a doe's year and plenty of fresh water will also greatly contribute to the amount of milk she produces.
Lactation Curves
All mammals have lactation curves, and does are no different. Because of these variances and the fact that it costs as much to keep a top producing doe as a poor producer, it is important to keep records of the costs of keeping your goats and the amount of milk each doe produces. For the backyard goat herder this seem to be more trouble than it's worth, but you will eventually find yourself becoming unhappy with a less than optimal milk supply.
Does' milk supply rises rapidly after kidding, known as parturition, in response to the demands of their growing offspring. Peak milk production is typically reached about 2 months after kidding and gradually declines, but you will likely notice slow drops interspersed with more dramatic drops until you dry off the doe. You can typically milk for about 10 months out of the year, but many people decide at some point that the amount of milk produced is no longer worth the effort and cost.
Households with goat diaries with animals that exhibit long lactations can milk them for as long as possible without rebreeding. Production might be lower in the second year, but this would be offset by avoiding a 2-month layoff for the doe while she is in the later half of the gestation period. However, a 10 month lactation cycle is typical for most does.
How many years can you milk a doe?
As stated above, a doe should kid her fresh offspring at about 12-13 months of age. Typically, maximum production occurs when the doe is four or five years old, assuming she has been bred every year. Does do not go through menopause like humans, but age is a factor in milk production. However, because most older does are more likely to die giving birth than of old age, many goat herd owners like to retire their does at around 10 years of age. Using this assumptions, you will typically milk your doe for about 9 years.
Recommended set-up for milking goats
Life Slice is dedicated to simplifying your life and in the case of goat milking you could certainly go the minimalist route and care for your goats in the field, tied or in a stock. However, with just a little bit of set-up in the beginning, tasks and chores will be made much easier and cleaner.
|
1. A milking room with a window and impervious floor
It doesn't need to be fancy, but a simple shed to keep you out of the sun and rain while you are trimming hooves, milking goats, or doing other maintenance on your herd will quickly become a luxury you'll appreciate it. It doesn't need to be large. The one at the left is a combination milk room and feed room that contains windows to minimize the use of electricity. The shed is built with a gap between the back wall and roof to maximize convection for summer milking comfort. The floor has been sealed with a special floor latex so it is impervious. Solar power is used in this shed t0 power the lights; more about that can be here. 2. Milking Stand Your milk stand will be handy not only for milking, but helps make work quick and easy when it comes time to trim hooves. The stands typically come in two different varieties -either folding, which will help save space, or bench style. Either is fine and these are also available for purchase. Making your own folding bench though is really that much more portable though unless it's one you purchase. If you make your own from lumber, it'll be too heave too easily and quickly move around. Many people decide to build their own stand of lumber. As seen in the figure tot he right, the milk stand has 2 sections - a bench sitting to the right and the place for the doe to stand on the left. If you are left handed, you'll likely want to reverse this set-up. The stand should be a minimum of 42" long by 15" wide. When building your own stand, note the direction of the lumber. This is important because it will prevent the goat from slipping should the stand become wet. The legs should be 15" high to allow easy mounting for the goat and comfortable seating for the milker. The stanchion is used so that the goat will be kept into place when working with it. Sweet feed provides an attractive incentive for the goat to get itself up on the stanchion. The stanchion should be built so you can easily slip a small feeder pan in and out , allowing for easy clean-up. Two 4x4 boards can be used as the braces. 3. Supplies
4. Clip hairy goats if required Goat milk has less bacteria than cow milk as it leaves the udder, but it is also more likely to put up coliform bacteria during the milking process. Because the excrement is dry, it easily turns to dust and the coliform bacteria is in the air, on flat surfaces and on the goat. Therefore, it is recommended to clip hair goats to minimize the disturbance of the animals' hair as well as to minimize the amount of hair that finds its way into the milk pail. 5. Milking the goat
Be sure to wash and dry you ands thoroughly before and after the milking of each goat, or use disposable latex gloves and switch to a new pair of gloves for each animals. |
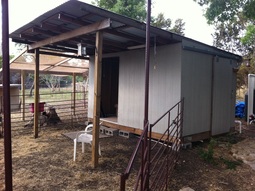 A simple shed with milking room and feed storage. A tin roof covers the building and porch to allow for rainwater collection. A shade cloth covered porch allows for sun protection while allowing for air flow. 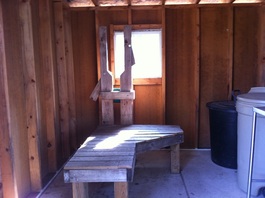 Milkstand with seating to the right. The goat stands to the left. The impervous floor allows for easy clean-up. 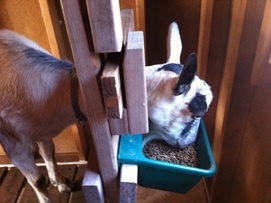 Alpine doe eating sweet feed while her head is restrained in the stanchion  Supplies for every day milking use. 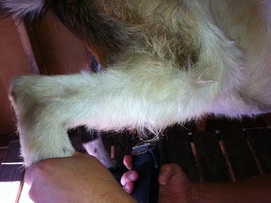 Clipping the doe's belly, udder and legs This video will walk you through the milking process. |
|
|
|
