Loading
Starting with seeds versus purchasing seedlings plants
When deciding what plants you want in your garden, you'll want to determine if you want to start your own plants from seed or buy plants. Factors that should guide your decision include:
- How far are you into the growing season? If you still have plenty of time, you may wish to start your plants from seed. If the growing season is already under way, buy plants.
- Availability of what you want. At times the ability to purchase plants will offer a more limited selection than that available via seed, especially if you are buying on line. However, remember to plan well in advance for your seed purchases. Some seeds and bulbs are difficult to find or have waiting lists, so plan accordingly.
- How prepared is your garden? If you are still working on your garden, or have limited space, growing vegetables and fruits in containers may be more desirable. This will also allow you to provide soil that is very specific to a particular plants needs.
- Most plants needs at least a month in a container after potting before planting out in their permanent home. This means plants should be at least 6 to 10 weeks old before they are transplanted.
Starting Seeds
Starting Seeds Indoors versus OutdoorsDepending on the time of year and weather considerations, you can begin seeds indoors in trays or pots or outdoors directly in the ground and then thin the plants as they grow. The determining factor will be to research what is the last average freeze date for your area. Many packages of seeds will explain when to start the seeds indoors relative to the last freeze date.
Starting your plants indoors will give them a head-start on the growing season. This is particularly helpful in areas where summer temperatures arrive quickly and begin to stress plants and compromise their fruit production. However, if you have good growing conditions, putting seeds directly into the ground will save you some labor later on. If planting indoors, make sure your plants will be in a bright, but indirect source of natural light. Make use of a sunny window or porch, depending upon how much space you need or use UV lights, often called "grow lights" but they have a tendency to make the plants grow spindly and less hardy. |
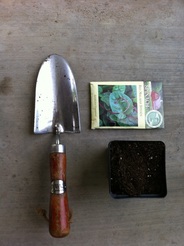 |
Supplies
- Containers: can be either purchased as trays, pots, peat circles or reused cleaned and sanitized containers such as fruit cups or even egg cartons. Always make sure the container has a hole at the bottom for drainage.
- Soil: use either premixed potting medium or preformed peat in their customized containers. Be sure to use a soil that doesn't compact.
- Small spade
- Seeds
- Broken pottery shards, packing peanuts or small pebbles to put in the bottom to keep the soil medium from washing out the drainage hole.
- Labels or popsicle sticks to label what you planted where. If you place and keep your pots in rows you can consider affixing the seed package to a stick.
- A spray bottle for watering. Anything that applies more water than a light mist will have a tendency to dislodge the plants.
Steps
1. If you have not purchased trays or containers pre-populated with growing medium or potting mix, you will need to prepare this. Fill the containers 4/5s of the way full and make sure you level is uniform in all the containers and press the soil into the container with your hand or tamper.
2. Make sure you read the seed package for special instructions. Some seeds may require a period of pre-chilling or soaking. Larger seeds such as melons can take up to 10 days to germinate. Soaking overnight will help to reduce that time by several days. Do not soak smaller seeds such as lettuce because they will all just clump together.
3. Small seeds can be sprinkled on top of the potting mix. Larger seeds can be counted out and planted individually.
4. If you are using pots, like in the photo above, use at least 3 seeds per container, since not all seeds will germinate and not all that do germinate will survive. You can thin extras later.
5. Check your seed packets for depth instructions and add additional soil medium gently, accordingly. Some seeds like lettuce and herbs barely need to be covered and can almost be scatter over the soil medium.
6. Water again with a mister or very fine sprinkle of water from a watering can.
7. Move your container to a warm, draft free spot and check it daily. Check your seed packets to determine what temperatures your seeds will germinate best at. Warm weather plants will germinate best when the temperature is between 65 and 70 degrees F. Cold weather plants like lettuce and herbs like cilantro, will want something slightly cooler that that.
|
8. The first two leaves that appear are actually not leaves at all, but starter leaves, called coyledons. These serve as a food source for the plant until it can grow its own true leaves and photosynthesize.
9. Seedlings like requirements will depend upon the time of year and intensity of the sun's rays. When starting a spring garden in mid- to late-winter, you'll want to start your seedlings indoors and provide them with at least 12 hours of sun or florescent light per day. When starting a fall garden in the summer you can start your garden outside, the sun's rays will likely be too intense and you will need to reduce the amount of light received. In the southern central and western U.S. during the months of July and August, any direct sun may be too much. 10. If you planted multiple seeds in a pot and more than one successfully germinated. When the plants are a couple of inches tall and have a few leaves, you will need to separate the plants into separate pots or cull the weaker plants. Don't pull out the extra seedlings, or you may damage the root of the plant you intend to keep. 11. If you are going to repot the other seedlings, you can "pot up" if a larger pot is needed. For more information, see Potting Up, below. |
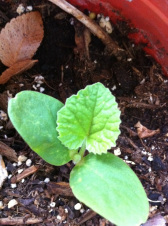 Note the two starter leaves and the one true leaf on this seedling |
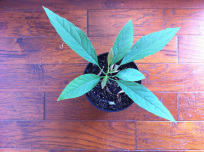 This avocado tree was started from a seed |
When putting a plant into the ground, it needs special attention from the time it is planted until the point at which the plant is mature. The plants must be in good condition before planting and this means providing your seedlings with the best possible start in life to help them be as hardy as possible.
If you have a seedling that looks stressed for any reason other than being root bound, take the time to strengthen the plant before introducing the additional stress of transplanting. All plants dislike root disturbance and will cease growing for a period after being put into the ground until their roots once again start reabsorbing nutrients from the soil. |
Transplanting and Potting Up
- Taking a plant out of a pot and putting it into a larger pot is called potting up or potting on.
- Seedlings can be moved into larger pots once they are a few inches tall and have a few true leaves.
- Select a container one size larger than the pot the plant is in now. Make sure the pot is clean. Place a shard from a broken pot or a piece of screen over the drainage hole to keep soil from washing out.
- Fill the container approximately 2/3 full with soil.
- If the soil in the existing pot is very dry, wetting it may help with removal.
- To remove, hold your hand against the soil and around the stem, turn the pot upside down, and tap the rim on a surface. Once it's loose, grasp the plant near the soil; pull gently, cradling the plant in your hand.
- Disturb the roots as little as possible unless the roots have become bound together.
- If the roots are tangled, lightly loosen the outer part of the root ball with your hands or a knife, being careful not to damage the delicate roots.
- Position the plant in the pot. Fill in soil around it, pressing gently down on the soil until the soil level is even with the root ball.
- Water the plant in. If the soil sinks significantly, add in a bit more soil as needed.
|
|
|
