How to Grow New Plants from Cuttings: Propagation
Loading
Propagating: How to Grow Plants from Cuttings
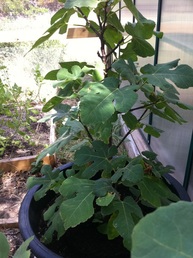 This fig tree was started via propagation |
Why Propagate?Cuttings are one of the easiest ways to increase your plants. Propagation not only allows you to cost effectively increase the number of plants that you have, but also provides a contingency plan for when the worst case scenario happens and you do lose plants that need to be replaced.
This sort of vegetative propagation ensures an exact replica of the original plant. Shrubs and perennials with soft growing tips and other soft0growing tips and other softer-stemmed plants can be propagated from other soft-wood cuttings once they are in spring and summer growth. In midsummer, cutting can also be taken from a segment where the new growth is beginning to turn woody. Properly implemented, this will work for deciduous shrubs, roses and evergreens. |
What to use for soil for propagated plants
The soil used for cuttings should be able to retain moisture for a period of time, but also provide good drainage so the stem of the plant does not rot as it starts the process of forming its own root system. There is not set rule for what works and doesn't work, but generally 50/50 mixtures of soil and a draining agent work well. What works best for you will also depend upon the climate in which you have placed the plant.
Avoid using small pots and especially ones made of clay as they will dry out too quickly. What seems to work well are reusing containers you are likely to have around from when you may have purchased plants at a nursery. Allowing the soil to dry out or the plant to wilt must be avoided. If this happens, it is often very difficult to save the plant if not impossible. For trees and shrubs, a minimum of a 6" diameter pot works well, remembering the plant will need to stay in this container for one year and will need room to grow.
- 50% potting soil mixed with 50% perlite works well for many applications.
- 50% good native soil (if you have it) mixed with 50% sand also often yields success.
- 50% peat and 50% perlite works well in areas that are more prone to allowing the soil to dry out more quickly.
Avoid using small pots and especially ones made of clay as they will dry out too quickly. What seems to work well are reusing containers you are likely to have around from when you may have purchased plants at a nursery. Allowing the soil to dry out or the plant to wilt must be avoided. If this happens, it is often very difficult to save the plant if not impossible. For trees and shrubs, a minimum of a 6" diameter pot works well, remembering the plant will need to stay in this container for one year and will need room to grow.
How to Propagate
It is preferable, although depending on the species, may not be essential, to take cuttings on a cool day or in the morning or evening of a warm day, putting them immediately into a plastic bag with some water, and preferably a 50/50 mixture of sand and local soil from which the cutting was lifted. Tip cuttings off soft-wood growth should normally include at least 3 leaf pairs and be at least 2 inches long. They should never be taken from a non-flowering shoot, but if this is not possible, trim off any flowers or buds.
Use a sharp knife to cut just below a leaf node such as a branch with a heel, which is where most of the root-forming nutrients collect. Immediately place the cuttings into a plastic bag with some moisture and preferably a bit of sand to keep the cutting tips moist..
Upon getting the cutting to the end location, trim off any dead or damaged leave immediately pot the cutting in a rooting medium and good soil either into trenches in the ground or a container. The plants will need to stay in this location for at least one year, so select your transplanting location carefully.
Although some may prefer not to do so, you will typically see an increased success rate if you dip the end of the cuttings in a hormone rooting powder to stimulate root growth. However, be very careful to read the instructions and do not get the powder on your skin.
Next, make a small planting hole in the trench or potting container, place the cutting in the hole and firmly press the soil down around the cutting. Depending upon the size of your cutting and area where you are planting them, it may make sense to place more than one cutting into a given container. If so plant them around the periphery of the pots. They can then be potted up individually after they have developed a sufficient root system, but again, plan to allow enough room for them to be able to stay in their containers for one year. If your plants' growth begins to stall out, you will know it's time to move them to a larger container of their own.
Care of your propagated cuttings
|
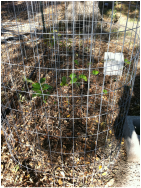
A row of trees was started using propagation. Planting cuttings under larger trees provides protection from the sun. Cages protect tender new leaves from deer.
|
Propagating Vines
Vines will typically take over and grown new plants themselves, but there are times where you might like to have a plant to give to a friend and there is a much quicker way to accomplish this than finding a suitably sized plant and digging it out of the ground or another pot: Although it is certainly possible to cut the vine and propagate it using the method described above, this method seems much faster and with an almost guaranteed success rate.
- Locate a vine on the parent plant towards the tip that has some new and healthy growth.
- Take a small pot filled with a compost/sand or potting soil/perlite mixture as described above, dig a hole large enough to keep the vine secured inside the pot.
- Cover the vines with enough of the soil mixture to make sure the vine stays secure and water in well. If the vine has difficulty staying you can stake it down with a small pin.
- Keep moist and out of hot sun and watch for root formation. Typically within two weeks you will begin to see new stems forming from the area where the vine has been buried.
- At this time you can snip the vine from the parent plant and continue its growth independently. was Hardening plants will enable them to withstand the shock of being transplanted into the garden and move quicker toward new growth and fruiting. Most nursery plants have been living in a sheltered indoor environment with limited to no environmental fluctuations.
|
|
